Windows + XAMPP + OpenSSL
ローカルPCでSSLを利用できるようにする実験です。環境はWindows Vista + XAMPP + OpenSSLで、XAMPPにバンドルされているopensslを利用します。XAMPPのバージョンは1.6.6aです。
この記事では証明書発行を自己署名で行っているため、「https://localhost~」でアクセスすると警告が表示されますが、有効期限が更新されることは確認できます。
更新前
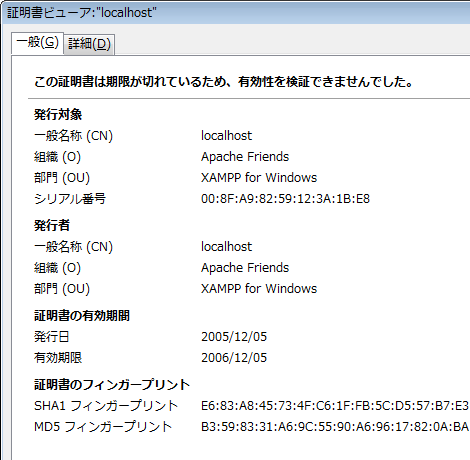
更新後

1.opensslフォルダ作成
C:¥xampp¥apacheにopensslフォルダを作成します。
2.openssl.cnfのコピー
C:¥xampp¥apache¥bin¥openssl.cnfをC:¥xampp¥apache¥opensslにコピーします。
3.openssl.cnf修正
コピーしたopenssl.cnfを修正します。
変更前(赤色を削除:2ヶ所)
# This definition stops the following lines choking if HOME isn't
# defined.
HOME            = .
RANDFILE        = $ENV::HOME/.rnd

# Extra OBJECT IDENTIFIER info:
#oid_file       = $ENV::HOME/.oid
oid_section     = new_oids

# To use this configuration file with the "-extfile" option of the
# "openssl x509" utility, name here the section containing the
# X.509v3 extensions to use:
# extensions        =
# (Alternatively, use a configuration file that has only
# X.509v3 extensions in its main [= default] section.)

[ new_oids ]

# We can add new OIDs in here for use by 'ca' and 'req'.
# Add a simple OID like this:
# testoid1=1.2.3.4
# Or use config file substitution like this:
# testoid2=${testoid1}.5.6

####################################################################
[ ca ]
default_ca    = CA_default        # The default ca section

####################################################################
[ CA_default ]

dir        = ./demoCA        # Where everything is kept
certs      = $dir/certs        # Where the issued certs are kept
crl_dir    = $dir/crl        # Where the issued crl are kept
database   = $dir/index.txt    # database index file.
#unique_subject    = no            # Set to 'no' to allow creation of
                    # several ctificates with same subject.
new_certs_dir    = $dir/newcerts        # default place for new certs.

certificate  = $dir/cacert.pem     # The CA certificate
serial       = $dir/serial         # The current serial number
crlnumber    = $dir/crlnumber    # the current crl number
                    # must be commented out to leave a V1 CRL
crl          = $dir/crl.pem         # The current CRL
private_key  = $dir/private/cakey.pem# The private key
RANDFILE     = $dir/private/.rand    # private random number file
変更後(赤色を変更)
# This definition stops the following lines choking if HOME isn't
# defined.
HOME            = .
RANDFILE        = .rnd

# Extra OBJECT IDENTIFIER info:
#oid_file       = $ENV::HOME/.oid
oid_section     = new_oids

# To use this configuration file with the "-extfile" option of the
# "openssl x509" utility, name here the section containing the
# X.509v3 extensions to use:
# extensions        =
# (Alternatively, use a configuration file that has only
# X.509v3 extensions in its main [= default] section.)

[ new_oids ]

# We can add new OIDs in here for use by 'ca' and 'req'.
# Add a simple OID like this:
# testoid1=1.2.3.4
# Or use config file substitution like this:
# testoid2=${testoid1}.5.6

####################################################################
[ ca ]
default_ca    = CA_default        # The default ca section

####################################################################
[ CA_default ]

dir        = demoCA        # Where everything is kept
certs      = $dir¥certs        # Where the issued certs are kept
crl_dir    = $dir¥crl        # Where the issued crl are kept
database   = $dir¥index.txt    # database index file.
#unique_subject    = no            # Set to 'no' to allow creation of
                    # several ctificates with same subject.
new_certs_dir    = $dir¥newcerts        # default place for new certs.

certificate  = $dir¥cacert.pem     # The CA certificate
serial       = $dir¥serial         # The current serial number
crlnumber    = $dir¥crlnumber    # the current crl number
                    # must be commented out to leave a V1 CRL
crl          = $dir¥crl.pem         # The current CRL
private_key  = $dir¥private¥cakey.pem# The private key
RANDFILE     = $dir¥private¥.rand    # private random number file
4.sslフォルダ作成
C:¥xampp¥apache¥confにsslフォルダを作成します。
5.openssl起動
C:¥xampp¥apache¥conf¥sslに移動して、opensslを起動します。起動すると「OpenSSL>」というプロンプトが表示されます。
C:¥xampp¥apache¥conf¥ssl>C:¥xampp¥apache¥bin¥openssl
OpenSSL>
6.RSA 秘密鍵生成
OpenSSL> genrsa -out server.key 1024
Loading 'screen' into random state - done
Generating RSA private key, 1024 bit long modulus
.....................++++++
.++++++
e is 65537 (0x10001)
これでC:¥xampp¥apache¥conf¥ssl¥server.keyが生成されます。
7.CSR 生成
OpenSSL> req -new -config C:\xampp\apache\openssl\openssl.cnf -key server.key -o
ut csr.pem -sha1
You are about to be asked to enter information that will be incorporated
into your certificate request.
What you are about to enter is what is called a Distinguished Name or a DN.
There are quite a few fields but you can leave some blank
For some fields there will be a default value,
If you enter '.', the field will be left blank.
-----
Country Name (2 letter code) [AU]:JP(国コード)
State or Province Name (full name) [Some-State]:Chiba(都道府県名)
Locality Name (eg, city) []:Ichikawa(市区町村名)
Organization Name (eg, company) [Internet Widgits Pty Ltd]:Apache Friends(組織名)
Organizational Unit Name (eg, section) []:XAMPP for Windows(組織内ユニット名)
Common Name (eg, YOUR name) []:localhost(アクセス名[http://アクセス名])
Email Address []:(管理者メールアドレス:オプション)

Please enter the following 'extra' attributes
to be sent with your certificate request
A challenge password []:(Enter)
An optional company name []:(Enter)
これでC:¥xampp¥apache¥conf¥ssl¥csr.pemが生成されます。
8.証明書の発行
OpenSSL> x509 -in csr.pem -out server.crt -req -signkey server.key -days 365 -sh
a1
Loading 'screen' into random state - done
Signature ok
subject=/C=JP/ST=Chiba/L=Ichikawa/O=Apache Friends/OU=XAMPP for Windows/CN=local
host
これでC:¥xampp¥apache¥conf¥ssl¥server.crtが生成されます。
以降で使用するファイルはserver.keyとserver.crtのみです。
9.httpd-ssl.confの修正
C:¥xampp¥apache¥conf¥extra¥httpd-ssl.confの以下の赤色部分を修正します。
変更前
    #   Server Certificate:
    #   Point SSLCertificateFile at a PEM encoded certificate.  If
    #   the certificate is encrypted, then you will be prompted for a
    #   pass phrase.  Note that a kill -HUP will prompt again.  Keep
    #   in mind that if you have both an RSA and a DSA certificate you
    #   can configure both in parallel (to also allow the use of DSA
    #   ciphers, etc.)
    #SSLCertificateFile conf/ssl.crt/snakeoil-rsa.crt
    #SSLCertificateFile conf/ssl.crt/snakeoil-dsa.crt
    SSLCertificateFile conf/ssl.crt/server.crt

    #   Server Private Key:
    #   If the key is not combined with the certificate, use this
    #   directive to point at the key file.  Keep in mind that if
    #   you've both a RSA and a DSA private key you can configure
    #   both in parallel (to also allow the use of DSA ciphers, etc.)
    #SSLCertificateKeyFile conf/ssl.key/snakeoil-rsa.key
    #SSLCertificateKeyFile conf/ssl.key/snakeoil-dsa.key
    SSLCertificateKeyFile conf/ssl.key/server.key
変更後
    #   Server Certificate:
    #   Point SSLCertificateFile at a PEM encoded certificate.  If
    #   the certificate is encrypted, then you will be prompted for a
    #   pass phrase.  Note that a kill -HUP will prompt again.  Keep
    #   in mind that if you have both an RSA and a DSA certificate you
    #   can configure both in parallel (to also allow the use of DSA
    #   ciphers, etc.)
    #SSLCertificateFile conf/ssl.crt/snakeoil-rsa.crt
    #SSLCertificateFile conf/ssl.crt/snakeoil-dsa.crt
    SSLCertificateFile conf/ssl/server.crt

    #   Server Private Key:
    #   If the key is not combined with the certificate, use this
    #   directive to point at the key file.  Keep in mind that if
    #   you've both a RSA and a DSA private key you can configure
    #   both in parallel (to also allow the use of DSA ciphers, etc.)
    #SSLCertificateKeyFile conf/ssl.key/snakeoil-rsa.key
    #SSLCertificateKeyFile conf/ssl.key/snakeoil-dsa.key
    SSLCertificateKeyFile conf/ssl/server.key
これでApacheを再起動すれば、作成した証明書が適用されます。
10.参考サイト
参考サイトは以下です。ありがとうございました。
Posted by yujiro このページの先頭に戻る
- PHPをビルドしてApacheと連携させる方法
- ApacheのCGIでソースが表示される場合の対処
- Apache 2.4 系をソースからインストール
- 「php_flag short_open_tag off」の意味
- mod_rewriteの動作を確認する方法
- WindowsにApacheを簡単にインストールする方法
- Windows+ApacheでSSLを有効にする方法
- Apacheログのリクエスト時間にミリ秒・マイクロ秒を表示する
- PHP における「モジュール版」と「CGI 版」の比較 + WordPress の適用例
- Apache のチューニング(その3)・DiceによるWindows再起動
- Apache のチューニング(その2)
- Apache のチューニング(その1)
トラックバックURL
コメントする
greeting