WordPressのTwenty Elevenテーマ解説:メインインデックスのテンプレート (index.php)
WordPressの勉強も兼ねて、Twenty Elevenテーマの各テンプレートについて解説してみたいと思います。確認バージョンは3.2.1です。
メインインデックスのテンプレート (index.php)
Twenty Elevenテーマの「メインインデックスのテンプレート (index.php)」で出力されるページは次のようになります。

テンプレートのソースコードは次のとおりです。
<?php
/**
 * The main template file.
 *
 * This is the most generic template file in a WordPress theme
 * and one of the two required files for a theme (the other being style.css).
 * It is used to display a page when nothing more specific matches a query.
 * E.g., it puts together the home page when no home.php file exists.
 * Learn more: http://codex.wordpress.org/Template_Hierarchy
 *
 * @package WordPress
 * @subpackage Twenty_Eleven
 */

get_header(); ?>
<div id="primary">
    <div id="content" role="main">

    <?php if ( have_posts() ) : ?>

        <?php twentyeleven_content_nav( 'nav-above' ); ?>

        <?php /* Start the Loop */ ?>
        <?php while ( have_posts() ) : the_post(); ?>

            <?php get_template_part( 'content', get_post_format() ); ?>

        <?php endwhile; ?>

        <?php twentyeleven_content_nav( 'nav-below' ); ?>

    <?php else : ?>

        <article id="post-0" class="post no-results not-found">
            <header class="entry-header">
                <h1 class="entry-title"><?php _e( 'Nothing Found', 'twentyeleven' ); ?></h1>
            </header><!-- .entry-header -->

            <div class="entry-content">
                <p><?php _e( 'Apologies, but no results were found for the requested archive. Perhaps searching will help find a related post.', 'twentyeleven' ); ?></p>
                <?php get_search_form(); ?>
            </div><!-- .entry-content -->
        </article><!-- #post-0 -->

    <?php endif; ?>

    </div><!-- #content -->
</div><!-- #primary -->

<?php get_sidebar(); ?>
<?php get_footer(); ?>
1.ヘッダー情報の出力
ヘッダー情報はget_header()で出力します。
<?php
…中略…
get_header(); ?>
ヘッダー情報は、トップページの赤枠部分が対応します。

get_header()はwp-includes/general-template.phpに実装されています。
wp-includes/general-template.php
function get_header( $name = null ) {
    do_action( 'get_header', $name );

    $templates = array();
    if ( isset($name) )
        $templates[] = "header-{$name}.php";

    $templates[] = 'header.php';

    // Backward compat code will be removed in a future release
    if ('' == locate_template($templates, true))
        load_template( ABSPATH . WPINC . '/theme-compat/header.php');
}
do_action()はフックポイント「get_header」の作成を行っています。
do_action( 'get_header', $name );プラグインを作成している方はすでにご存知と思いますが、add_action()を使えばフックポイントに任意のアクションを追加できます。
例えばプラグインで次のコードを記述すれば、フックポイント「get_header」、つまりdo_action('get_header')の実行時にfoo()が起動され、doctype宣言の前に「foo」が出力されます。
<?php
/*
Plugin Name: Foo
Description: Foo
Version: 1.0
*/
function foo() {
  echo "foo";
}
add_action('get_header', 'foo');
?>
話を戻して、get_header()では、パラメータに設定した文字列をテンプレート名として利用します。「get_header('foo')」と書いておけば、「header-foo.php」を「header.php」の代わりにロードします。パラメータの設定がなければ「header.php」をロードします。
    $templates = array();
    if ( isset($name) )
        $templates[] = "header-{$name}.php";

    $templates[] = 'header.php';
2.記事の有無判定
次のif文では、記事の有無判定により処理を振り分けています。
    <?php if ( have_posts() ) : ?>
      // 記事が投稿されている場合の処理
    <?php else : ?>
      // 記事が投稿されていない場合の処理
    <?php endif; ?>
have_posts()は投稿記事をチェックする関数で、wp-includes/query.phpに実装されています。
wp-includes/query.php
function have_posts() {
    global $wp_query;

    return $wp_query->have_posts();
}
投稿記事が存在する場合はtrue、存在しない場合はfalseを返却します。パラメータはありません。ここではhave_posts()をif文で使っていますが、この関数はループ処理で利用することもできます。
if文の中の処理の説明は後回しにして、それぞれどのような出力になるかをご覧ください。
記事が投稿されている場合(記事データを出力)
記事が投稿されていない場合(メッセージと検索フォームを出力)

次に、それぞれの処理について解説します。
3.ナビゲーションの表示
投稿記事がある場合はナビゲーションとコンテンツを出力します。ここではナビゲーションの出力について説明します。該当する処理は次の赤色部分になります。
    <?php if ( have_posts() ) : ?>

        <?php twentyeleven_content_nav( 'nav-above' ); ?>

        <?php /* Start the Loop */ ?>
        <?php while ( have_posts() ) : the_post(); ?>

            <?php get_template_part( 'content', get_post_format() ); ?>

        <?php endwhile; ?>

        <?php twentyeleven_content_nav( 'nav-below' ); ?>
twentyeleven_content_nav()はTwenty Elevenテーマの独自処理で、表示する記事数が1ページを超える場合に前後のナビゲーションを表示します。1ページの表示記事数は「設定」→「表示設定」→「1ページに表示する最大投稿数」で決まります。
ナビゲーション

twentyeleven_content_nav()は、テーマのfunctions.phpに実装されています。
functions.php
/**
* Display navigation to next/previous pages when applicable
*/
function twentyeleven_content_nav( $nav_id ) {
global $wp_query;
if ( $wp_query->max_num_pages > 1 ) : ?>
<nav id="<?php echo $nav_id; ?>">
<h3 class="assistive-text"><?php _e( 'Post navigation', 'twentyeleven' ); ?></h3>
<div class="nav-previous"><?php next_posts_link( __( '<span class="meta-nav">←</span> Older posts', 'twentyeleven' ) ); ?></div>
<div class="nav-next"><?php previous_posts_link( __( 'Newer posts <span class="meta-nav">→</span>', 'twentyeleven' ) ); ?></div>
</nav><!-- #nav-above -->
<?php endif;
}「$wp_query->max_num_pages」が最大ページ数です。
さて、ナビゲーションは基本的に記事の上部と下部の2ヶ所に表示されるのですが、このテーマではトップページのみ記事の下部にだけ表示されるように仕込まれています。
トップページのナビゲーション(記事の下部のみ)

この技は、style.cssにある次のセレクタを使って実現しています。
「nav-above」は記事の上部に表示するナビゲーションのid属性値で常に非表示ですが、「paged」はトップページ以外の前後ページでbody要素に与えられるclass属性値で、このときだけdiplayプロパティを「block」に変更しています。
#nav-above {
    display: none;
}
.paged #nav-above {
    display: block;
}
4.コンテンツの表示
ナビゲーション出力処理にはさまれて、赤色で示すコンテンツ出力処理があります。
    <?php if ( have_posts() ) : ?>

        <?php twentyeleven_content_nav( 'nav-above' ); ?>

        <?php /* Start the Loop */ ?>
        <?php while ( have_posts() ) : the_post(); ?>

            <?php get_template_part( 'content', get_post_format() ); ?>

        <?php endwhile; ?>

        <?php twentyeleven_content_nav( 'nav-below' ); ?>
while文で、先に説明したhave_posts()を使って判定し、表示する記事があるまで繰り返します。
the_post()は投稿データをロードする関数です。the_post()を実行しただけでは何も出力しません。
余談ですが、while/have_posts()/the_post()の組み合わせは、Movable Typeの次のテンプレートタグを書いた状態とほぼ同じと言えるでしょう。
<mt:Entries>
</mt:Entries>
get_template_part()でコンテンツを出力します。get_template_part()はwp-includes/general-template.phpに実装されています。
wp-includes/general-template.php
function get_template_part( $slug, $name = null ) {
    do_action( "get_template_part_{$slug}", $slug, $name );

    $templates = array();
    if ( isset($name) )
        $templates[] = "{$slug}-{$name}.php";

    $templates[] = "{$slug}.php";

    locate_template($templates, true, false);
}
do_action()でフックポイント「get_template_part_スラッグ名」の作成を行っています。この場合はスラッグ名は「content」なので、フックポイント名は「get_template_part_content」になります。
また、get_header()と同様、第1パラメータと第2パラメータに設定された名前を使ってテンプレートを呼び出します。第2パラメータが設定されていれば、
「スラッグ名-名前.php」でテンプレートを呼び出します。第2パラメータが設定されていなければ、「スラッグ名.php」でテンプレートを呼び出します。
get_template_part()の第1パラメータは「content」ですが、第2パラメータには「get_post_format()」という関数名が設定されています。言い換えると、get_post_format()の実行結果が第2パラメータに設定されることになります。
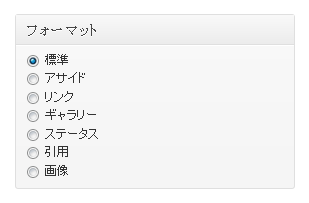
<?php get_template_part( 'content', get_post_format() ); ?>このget_post_format()は何者か?ということですが、記事の場合は投稿画面にある「フォーマット」を取得するための関数です。
get_post_format()は、wp-includes/post.phpに実装されています。
wp-includes/post.php
function get_post_format( $post = null ) {
    $post = get_post($post);

    if ( ! post_type_supports( $post->post_type, 'post-formats' ) )
        return false;

    $_format = get_the_terms( $post->ID, 'post_format' );

    if ( empty( $_format ) )
        return false;

    $format = array_shift( $_format );

    return ( str_replace('post-format-', '', $format->slug ) );
}
つまり、while文の中で実行しているget_post_format()の実行結果は、記事単位に異なります。フォーマットとget_post_format()の実行結果、対応するテンプレートは次のようになります。
| フォーマット | 実行結果 | テンプレート |
|---|---|---|
| 標準 | 0(なし) | content.php |
| アサイド | aside | content-aside.php |
| リンク | link | content-link.php |
| ギャラリー | gallery | content-gallery.php |
| ステータス | status | content-status.php |
| 引用 | quote | content-quote.php |
| 画像 | image | content-image.php |
余談ですが、テーマにあるその他の「content-xx.php」は次のように他のテンプレートに対応しています。
| テンプレート | 利用テンプレート |
|---|---|
| content-intro.php content-feature.php | showcase.php |
| content-page.php | page.php sidebar-page.php |
| content-single.php | single.php |
5.検索フォームの出力
投稿記事がなかった場合には検索フォームを出力します。
    <?php else : ?>

        <article id="post-0" class="post no-results not-found">
            <header class="entry-header">
                <h1 class="entry-title"><?php _e( 'Nothing Found', 'twentyeleven' ); ?></h1>
            </header><!-- .entry-header -->

            <div class="entry-content">
                <p><?php _e( 'Apologies, but no results were found for the requested archive. Perhaps searching will help find a related post.', 'twentyeleven' ); ?></p>
                <?php get_search_form(); ?>
            </div><!-- .entry-content -->
        </article><!-- #post-0 -->
_e()は、日本語ローカライズを行うためのものです。第1パラメータにローカライズ対象の文字列、第2パラメータがドメイン名を指定します。
<h1 class="entry-title"><?php _e( 'Nothing Found', 'twentyeleven' ); ?></h1>検索フォームの出力にget_search_form()を使っています。
<?php get_search_form(); ?>get_search_form()は、wp-includes/general-template.phpに実装されています。
wp-includes/general-template.php
function get_search_form($echo = true) {
    do_action( 'get_search_form' );

    $search_form_template = locate_template('searchform.php');
    if ( '' != $search_form_template ) {
        require($search_form_template);
        return;
    }

    $form = '<form role="search" method="get" id="searchform" action="' . home_url( '/' ) . '" >
    <div><label class="screen-reader-text" for="s">' . __('Search for:') . '</label>
    <input type="text" value="' . get_search_query() . '" name="s" id="s" />
    <input type="submit" id="searchsubmit" value="'. esc_attr__('Search') .'" />
    </div>
    </form>';

    if ( $echo )
        echo apply_filters('get_search_form', $form);
    else
        return apply_filters('get_search_form', $form);
}
テーマに「searchform.php」があればその内容を返却します。そうでない場合はget_search_form()の中で生成した検索フォームを返却します。do_action()の動作は前述と同じなので、割愛します。
6.サイドバー情報の出力
サイドバー情報は、トップページの赤枠部分が対応します。

サイドバー情報はget_sidebar()で出力します。
<?php get_sidebar(); ?>get_sidebar()は、wp-includes/general-template.phpに実装されています。
wp-includes/general-template.php
function get_sidebar( $name = null ) {
    do_action( 'get_sidebar', $name );

    $templates = array();
    if ( isset($name) )
        $templates[] = "sidebar-{$name}.php";

    $templates[] = 'sidebar.php';

    // Backward compat code will be removed in a future release
    if ('' == locate_template($templates, true))
        load_template( ABSPATH . WPINC . '/theme-compat/sidebar.php');
}
get_sidebar()では、パラメータに設定した文字列をテンプレート名として利用します。「get_sidebar('foo')」と書いておけば、「sidebar-foo.php」を「sidebar.php」の代わりにロードします。
7.フッター情報の出力
フッター情報は、トップページの赤枠部分が対応します。

フッター情報はget_footer()で出力します。
<?php get_footer(); ?>get_footer()は、wp-includes/general-template.phpに実装されています。
wp-includes/general-template.php
function get_footer( $name = null ) {
    do_action( 'get_footer', $name );

    $templates = array();
    if ( isset($name) )
        $templates[] = "footer-{$name}.php";

    $templates[] = 'footer.php';

    // Backward compat code will be removed in a future release
    if ('' == locate_template($templates, true))
        load_template( ABSPATH . WPINC . '/theme-compat/footer.php');
}
パラメータの設定やフックポイントの設定はこれまでと同様なので省略します。
- WordPressテーマ(レスポンシブWebデザイン対応)
- WordPressのTwenty Elevenテーマ解説:サイドバー (sidebar.php)
- WordPressのTwenty Elevenテーマ解説:固定ページテンプレート (page.php)
- WordPressテーマ(テンプレート)バージョンアップ
- WordPressのTwenty Elevenテーマ解説:content.php(その2)
- WordPressのTwenty Elevenテーマ解説:content.php(その1)
- WordPressのTwenty Elevenテーマ解説:単一記事の投稿 (single.php)
- WordPressのTwenty Elevenテーマ解説:フッター (footer.php)
- WordPressのTwenty Elevenテーマ解説:ヘッダー (header.php):その3
- WordPressのTwenty Elevenテーマ解説:ヘッダー (header.php):その2
- WordPressのTwenty Elevenテーマ解説:ヘッダー (header.php):その1
- WordPressでウィジェットを作るカスタマイズ
- WordPress 3のサイドバーにウィジェットを表示するカスタマイズ
- WordPressテーマ(WordPress 3.x対応)
- WordPress テーマ修正(レイアウトの不具合)