WordPressのTwenty Elevenテーマ解説:ヘッダー (header.php):その1
WordPressの勉強も兼ねて、Twenty Elevenテーマの各テンプレートについて解説しています。確認バージョンは3.2.1です。
ヘッダー (header.php):その1
今回はヘッダーです。このエントリーでヘッダーテンプレートのすべてを紹介する予定でしたが、コードの深いところまでトレースしていくと予想以上に長くなってしまい、あきらめて数回に分けることにしました。
説明の中では、apply_filters()の役割や、_e()と__()の違い、bloginfo()とget_bloginfo()の違いなどについても触れています。
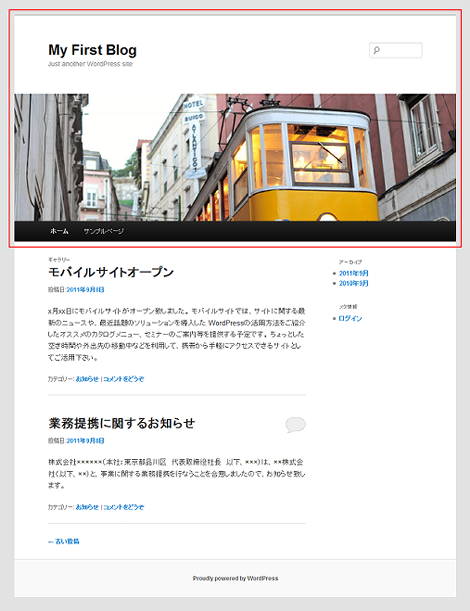
Twenty Elevenテーマの「ヘッダー (header.php)」は、スクリーンショットの赤枠で示す、WordPressのすべてのページのヘッダー部分(DOCTYPE~<div id="main">まで)に対応しています。
テンプレートのソースコードは次のとおりです。この回で説明するのは青色で示す部分です。
<?php
/**
 * The Header for our theme.
 *
 * Displays all of the <head> section and everything up till <div id="main">
 *
 * @package WordPress
 * @subpackage Twenty_Eleven
 * @since Twenty Eleven 1.0
 */
?><!DOCTYPE html>
<!--[if IE 6]>
<html id="ie6" <?php language_attributes(); ?>>
<![endif]-->
<!--[if IE 7]>
<html id="ie7" <?php language_attributes(); ?>>
<![endif]-->
<!--[if IE 8]>
<html id="ie8" <?php language_attributes(); ?>>
<![endif]-->
<!--[if !(IE 6) | !(IE 7) | !(IE 8)  ]><!-->
<html <?php language_attributes(); ?>>
<!--<![endif]-->
<head>
<meta charset="<?php bloginfo( 'charset' ); ?>" />
<meta name="viewport" content="width=device-width" />
<title><?php
    /*
     * Print the <title> tag based on what is being viewed.
     */
    global $page, $paged;

    wp_title( '|', true, 'right' );

    // Add the blog name.
    bloginfo( 'name' );

    // Add the blog description for the home/front page.
    $site_description = get_bloginfo( 'description', 'display' );
    if ( $site_description && ( is_home() || is_front_page() ) )
        echo " | $site_description";

    // Add a page number if necessary:
    if ( $paged >= 2 || $page >= 2 )
        echo ' | ' . sprintf( __( 'Page %s', 'twentyeleven' ), max( $paged, $page ) );

    ?></title>
<link rel="profile" href="http://gmpg.org/xfn/11" />
<link rel="stylesheet" type="text/css" media="all" href="<?php bloginfo( 'stylesheet_url' ); ?>" />
<link rel="pingback" href="<?php bloginfo( 'pingback_url' ); ?>" />
<!--[if lt IE 9]>
<script src="<?php echo get_template_directory_uri(); ?>/js/html5.js" type="text/javascript"></script>
<![endif]-->
<?php
    /* We add some JavaScript to pages with the comment form
     * to support sites with threaded comments (when in use).
     */
    if ( is_singular() && get_option( 'thread_comments' ) )
        wp_enqueue_script( 'comment-reply' );

    /* Always have wp_head() just before the closing </head>
     * tag of your theme, or you will break many plugins, which
     * generally use this hook to add elements to <head> such
     * as styles, scripts, and meta tags.
     */
    wp_head();
?>
</head>

<body <?php body_class(); ?>>
<div id="page" class="hfeed">
    <header id="branding" role="banner">
            <hgroup>
                <h1 id="site-title"><span><a href="<?php echo esc_url( home_url( '/' ) ); ?>" title="<?php echo esc_attr( get_bloginfo( 'name', 'display' ) ); ?>" rel="home"><?php bloginfo( 'name' ); ?></a></span></h1>
                <h2 id="site-description"><?php bloginfo( 'description' ); ?></h2>
            </hgroup>

            <?php
                // Check to see if the header image has been removed
                $header_image = get_header_image();
                if ( ! empty( $header_image ) ) :
            ?>
            <a href="<?php echo esc_url( home_url( '/' ) ); ?>">
                <?php
                    // The header image
                    // Check if this is a post or page, if it has a thumbnail, and if it's a big one
                    if ( is_singular() &&
                            has_post_thumbnail( $post->ID ) &&
                            ( /* $src, $width, $height */ $image = wp_get_attachment_image_src( get_post_thumbnail_id( $post->ID ), array( HEADER_IMAGE_WIDTH, HEADER_IMAGE_WIDTH ) ) ) &&
                            $image[1] >= HEADER_IMAGE_WIDTH ) :
                        // Houston, we have a new header image!
                        echo get_the_post_thumbnail( $post->ID, 'post-thumbnail' );
                    else : ?>
                    <img src="<?php header_image(); ?>" width="<?php echo HEADER_IMAGE_WIDTH; ?>" height="<?php echo HEADER_IMAGE_HEIGHT; ?>" alt="" />
                <?php endif; // end check for featured image or standard header ?>
            </a>
            <?php endif; // end check for removed header image ?>

            <?php
                // Has the text been hidden?
                if ( 'blank' == get_header_textcolor() ) :
            ?>
                <div class="only-search<?php if ( ! empty( $header_image ) ) : ?> with-image<?php endif; ?>">
                <?php get_search_form(); ?>
                </div>
            <?php
                else :
            ?>
                <?php get_search_form(); ?>
            <?php endif; ?>

            <nav id="access" role="navigation">
                <h3 class="assistive-text"><?php _e( 'Main menu', 'twentyeleven' ); ?></h3>
                <?php /*  Allow screen readers / text browsers to skip the navigation menu and get right to the good stuff. */ ?>
                <div class="skip-link"><a class="assistive-text" href="#content" title="<?php esc_attr_e( 'Skip to primary content', 'twentyeleven' ); ?>"><?php _e( 'Skip to primary content', 'twentyeleven' ); ?></a></div>
                <div class="skip-link"><a class="assistive-text" href="#secondary" title="<?php esc_attr_e( 'Skip to secondary content', 'twentyeleven' ); ?>"><?php _e( 'Skip to secondary content', 'twentyeleven' ); ?></a></div>
                <?php /* Our navigation menu.  If one isn't filled out, wp_nav_menu falls back to wp_page_menu. The menu assiged to the primary position is the one used. If none is assigned, the menu with the lowest ID is used. */ ?>
                <?php wp_nav_menu( array( 'theme_location' => 'primary' ) ); ?>
            </nav><!-- #access -->
    </header><!-- #branding -->

    <div id="main">
1.html要素のdir属性出力
DOCTYPE宣言の下に、IEの条件付きコメントの中にlanguage_attributes()が使われています。
<!--[if IE 6]>
<html id="ie6" <?php language_attributes(); ?>>
<![endif]-->
<!--[if IE 7]>
<html id="ie7" <?php language_attributes(); ?>>
<![endif]-->
<!--[if IE 8]>
<html id="ie8" <?php language_attributes(); ?>>
<![endif]-->
<!--[if !(IE 6) | !(IE 7) | !(IE 8)  ]><!-->
<html <?php language_attributes(); ?>>
<!--<![endif]-->
この関数は、次のような内容を出力します。
dir="ltr" lang="ja"まず、dir属性の出力について解説します。
language_attributes()はwp-includes/general-template.phpに実装されています。dir属性の出力は赤色部分が対応します。
wp-includes/general-template.php
function language_attributes($doctype = 'html') {
    $attributes = array();
    $output = '';

    if ( function_exists( 'is_rtl' ) )
        $attributes[] = 'dir="' . ( is_rtl() ? 'rtl' : 'ltr' ) . '"';

    if ( $lang = get_bloginfo('language') ) {
        if ( get_option('html_type') == 'text/html' || $doctype == 'html' )
            $attributes[] = "lang=\"$lang\"";

        if ( get_option('html_type') != 'text/html' || $doctype == 'xhtml' )
            $attributes[] = "xml:lang=\"$lang\"";
    }

    $output = implode(' ', $attributes);
    $output = apply_filters('language_attributes', $output);
    echo $output;
}
function_exists()はパラメータに指定した関数が定義されている場合にtrueを返却するPHPの関数です。ここではis_rtlという関数定義を判断して、定義されていれば、配列変数$attributesに「dir="rtl"」または「dir="ltr"」を設定します。
dir 属性は要素のテキストの方向性を指定するためのもので、値は次の意味をもちます。
- ltr:該当の要素のコンテンツが明示的に左から右向きに組み込まれたテキスト
- rtl:該当の要素のコンテンツが明示的に右から左向きに組み込まれたテキスト
どちらの値を設定するかは、is_rtl()で判定しています。is_rtl()はwp-includes/locale.phpの最後に実装されています。
wp-includes/locale.php
function is_rtl() {
    global $wp_locale;
    return $wp_locale->is_rtl();
}
話がちょっと長くなりますが、変数$wp_localeはwp-settings.phpで定義しています。
$wp_locale = new WP_Locale();WP_Localeクラスは先程のwp-includes/locale.phpで宣言されています。
/**
 * Class that loads the calendar locale.
 *
 * @since 2.1.0
 */
class WP_Locale {
    // ...
}
ということで、is_rtl()の処理にある、
return $wp_locale->is_rtl();は、WP_Localeクラスの中に定義されていることが分かります。
class WP_Locale {
    // ...
    function is_rtl() {
        return 'rtl' == $this->text_direction;
    }
}
変数$text_directionは同じクラス内に記述されています。値は「ltr」固定のようです。
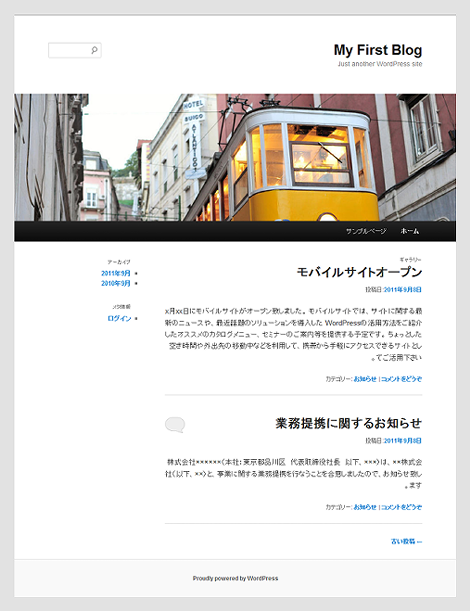
var $text_direction = 'ltr';この部分を「rtl」に書き換えると、ページは次のようになります。
2.html要素のlang属性出力
1項で説明したlanguage_attributes()の赤色部分でlang属性も出力します。
function language_attributes($doctype = 'html') {
    $attributes = array();
    $output = '';

    if ( function_exists( 'is_rtl' ) )
        $attributes[] = 'dir="' . ( is_rtl() ? 'rtl' : 'ltr' ) . '"';

    if ( $lang = get_bloginfo('language') ) {
        if ( get_option('html_type') == 'text/html' || $doctype == 'html' )
            $attributes[] = "lang=\"$lang\"";

        if ( get_option('html_type') != 'text/html' || $doctype == 'xhtml' )
            $attributes[] = "xml:lang=\"$lang\"";
    }

    $output = implode(' ', $attributes);
    $output = apply_filters('language_attributes', $output);
    echo $output;
}
処理中で使われているget_bloginfo()はパラメータに指定した情報を取得する関数で、wp-includes/general-template.phpに実装されています。今回の該当部分のみ抜粋して掲載します。
function get_bloginfo( $show = '', $filter = 'raw' ) {
    // ...
    switch( $show ) {
        case 'language':
            $output = get_locale();
            $output = str_replace('_', '-', $output);
            break;
    }
    // ...
    return $output;
}
get_bloginfo()の中で使われているget_locale()は、wp-includes/l10n.phpに実装されています。
wp-includes/l10n.php
function get_locale() {
    global $locale;

    if ( isset( $locale ) )
        return apply_filters( 'locale', $locale );

    // WPLANG is defined in wp-config.
    if ( defined( 'WPLANG' ) )
        $locale = WPLANG;

    // If multisite, check options.
    if ( is_multisite() && !defined('WP_INSTALLING') ) {
        $ms_locale = get_option('WPLANG');
        if ( $ms_locale === false )
            $ms_locale = get_site_option('WPLANG');

        if ( $ms_locale !== false )
            $locale = $ms_locale;
    }

    if ( empty( $locale ) )
        $locale = 'en_US';

    return apply_filters( 'locale', $locale );
}
今回は赤色部分のコードで「ja」という文字列を返却します。理由は、WordPressの日本語パッケージではwp-config.phpに次の内容が設定されているからです。
define('WPLANG', 'ja');次に、language_attributes()の中にあるget_option()は、管理画面の「設定」メニューの任意の項目などを取得する関数で、DBのwp_optionsテーブル(wp_が接頭辞の場合)に対応しているようです。
    if ( $lang = get_bloginfo('language') ) {
        if ( get_option('html_type') == 'text/html' || $doctype == 'html' )
            $attributes[] = "lang=\"$lang\"";

        if ( get_option('html_type') != 'text/html' || $doctype == 'xhtml' )
            $attributes[] = "xml:lang=\"$lang\"";
    }
ここでは、「html_type」を指定していますが、wp_optionsテーブルには該当のデータがないようなので(設定不足でしたらすいません)、変数$doctypeの値を判定します。変数$doctypeにはデフォルトで「html」が設定されているので、配列変数$attributesには「html="ja"」が設定されます。
あとは、implode()でdir属性とhtml属性を半角スペースで結合して出力します。
    $output = implode(' ', $attributes);
    $output = apply_filters('language_attributes', $output);
    echo $output;
3.apply_filters()について
テンプレートから話がそれますが、前項の赤色のapply_filters()について解説します。
apply_filters()は「WordPressのTwenty Elevenテーマ解説:メインインデックスのテンプレート (index.php)」で解説した、do_action()を使ってフックポイントを追加する動作に似ています。apply_filters()の役割は、フィルタ(出力内容をプラグインなどで書き換える)を追加するためのものです。
例えば、
apply_filters('language_attributes', $output);は、フックポイント「language_attributes」を追加し、書き換えの対象が$outputであることを示します。ここでは変数を1つしか設定していませんが、複数指定し、それらをフィルタの処理判定などに使うこともできます。
プラグインを作成している方はすでにご存知と思いますが、add_filter()を使えばフックポイントに任意のフィルタを追加できます。
今回の場合、プラグインで次のコードを記述すれば、フックポイント「language_attributes」、つまりapply_filters('language_attributes', $output)の実行時にbar()が起動され、html要素の最後に「class="bar"」が追加されます。
<?php
/*
Plugin Name: Bar
Description: Bar
Version: 1.0
*/

function bar($options) {
  return $options . " class=\"bar\"";
}
add_filter('language_attributes', 'bar', $options);
?>
4.meta要素のcharset属性の出力
meta要素のcharset属性値の出力には、bloginfo()を利用しています。
<meta charset="<?php bloginfo( 'charset' ); ?>" />bloginfo()はwp-includes/general-template.phpに実装されていて、先述のget_bloginfo()をキックしています。bloginfo()はget_bloginfo()の結果をechoしているのが大きな違いです。
wp-includes/general-template.php
function bloginfo( $show='' ) {
    echo get_bloginfo( $show, 'display' );
}
また、bloginfo()からget_bloginfo()をキックした場合はget_bloginfo()の中でapply_filters()が動作します。厳密に言えば、キックしなくてもget_bloginfo()の第2パラメータに「display」を指定すればapply_filters()が動作します。フックポイントは「bloginfo_url」と「bloginfo」の2種類があります。
get_bloginfo()でapply_filters()が起動する部分のみ抜粋しておきます。
function get_bloginfo( $show = '', $filter = 'raw' ) {
    // ...
    $url = true;
    if (strpos($show, 'url') === false &&
        strpos($show, 'directory') === false &&
        strpos($show, 'home') === false)
        $url = false;

    if ( 'display' == $filter ) {
        if ( $url )
            $output = apply_filters('bloginfo_url', $output, $show);
        else
            $output = apply_filters('bloginfo', $output, $show);
    }

    return $output;
}
$urlがtrueになる条件は、get_bloginfo()の第1パラメータが次のもの以外が設定されている場合です。
- url
- directory
- home
$urlがtrueになれば「bloginfo_url」のフィルタが登録されます。$urlがfalseになれば「bloginfo」のフィルタが登録されます(間違ってたらすいません)。
5.title要素の出力
次の部分でtitle要素を出力します。
<title><?php
    /*
     * Print the <title> tag based on what is being viewed.
     */
    global $page, $paged;

    wp_title( '|', true, 'right' );

    // Add the blog name.
    bloginfo( 'name' );

    // Add the blog description for the home/front page.
    $site_description = get_bloginfo( 'description', 'display' );
    if ( $site_description && ( is_home() || is_front_page() ) )
        echo " | $site_description";

    // Add a page number if necessary:
    if ( $paged >= 2 || $page >= 2 )
        echo ' | ' . sprintf( __( 'Page %s', 'twentyeleven' ), max( $paged, $page ) );

    ?></title>
トップページでページ送りをしていて3ページ目であれば、次のような表示になります。
![]()
表示内容の意味は次の通りです。
ブログ名 | キャッチフレーズ | ページ番号
変数$pagedには、ページ送り(ページング)を行った場合に、URLのクエリーに設定される「paged」の値が設定されます。$pageには特に値が設定されていないようです(間違っていたらすいません)。
global $page, $paged;内容の説明が前後しますが、先にページ番号についてまとめて説明します。ページ番号が2以上の場合に、次の部分でtitle要素に出力します。
    if ( $paged >= 2 || $page >= 2 )
        echo ' | ' . sprintf( __( 'Page %s', 'twentyeleven' ), max( $paged, $page
max()は、設定されたものから一番大きい値を返却するPHPの関数です。
__()は、日本語ローカライズを行うためのものです。第1パラメータにローカライズ対象の文字列、第2パラメータがドメイン名を指定します。wp-includes/l10n.phpに実装されています。
wp-includes/l10n.php
function __( $text, $domain = 'default' ) {
    return translate( $text, $domain );
}「WordPressのTwenty Elevenテーマ解説:メインインデックスのテンプレート (index.php)」で_e()について紹介しましたが、2つの関数の違いは、__()はreturnしているだけですが、_e()はechoしています。
function _e( $text, $domain = 'default' ) {
    echo translate( $text, $domain );
}
wp_title()はページタイトルを表示するテンプレートタグで、利用するページで処理が異なります。
wp_title( '|', true, 'right' );この関数はwp-includes/general-template.phpに実装されています(長いので掲載は省略)。パラメータの意味は次の通りです。
- 第1パラメータ:セパレータ文字列
- 第2パラメータ:wp_titleの実行結果をechoで表示する・しない(true/false)
- 第3パラメータ:セパレータの位置(right/left)
bloginfo('name')では、ブログ名を出力します。
bloginfo( 'name' );管理画面の「設定」→「一般」→「キャッチフレーズ」は次の部分で出力します。
    $site_description = get_bloginfo( 'description', 'display' );
    if ( $site_description && ( is_home() || is_front_page() ) )
        echo " | $site_description";
is_home()はサイトのトップページを表示していることを判定する関数で、wp-includes/query.phpに実装されています。
wp-includes/query.php
function is_home() {
    global $wp_query;

    if ( ! isset( $wp_query ) ) {
        _doing_it_wrong( __FUNCTION__, __( 'Conditional query tags do not work before the query is run. Before then, they always return false.' ), '3.1' );
        return false;
    }

    return $wp_query->is_home();
}is_front_page()は、サイトのフロントページが表示されているかどうかを判定する関数で、is_home()同様、wp-includes/query.phpに実装されています。
function is_front_page() {
    global $wp_query;

    if ( ! isset( $wp_query ) ) {
        _doing_it_wrong( __FUNCTION__, __( 'Conditional query tags do not work before the query is run. Before then, they always return false.' ), '3.1' );
        return false;
    }

    return $wp_query->is_front_page();
}
is_front_page()でtrueを返却するのは、管理画面の「設定」→「表示設定」→「フロントページの表示」にて、「最新の投稿」を選択して、最新の投稿ページが表示されている場合および、「固定ページ」を選択して、「フロントページ」に指定したページが表示されている場合です。
- WordPressテーマ(レスポンシブWebデザイン対応)
- WordPressのTwenty Elevenテーマ解説:サイドバー (sidebar.php)
- WordPressのTwenty Elevenテーマ解説:固定ページテンプレート (page.php)
- WordPressテーマ(テンプレート)バージョンアップ
- WordPressのTwenty Elevenテーマ解説:content.php(その2)
- WordPressのTwenty Elevenテーマ解説:content.php(その1)
- WordPressのTwenty Elevenテーマ解説:単一記事の投稿 (single.php)
- WordPressのTwenty Elevenテーマ解説:フッター (footer.php)
- WordPressのTwenty Elevenテーマ解説:ヘッダー (header.php):その3
- WordPressのTwenty Elevenテーマ解説:ヘッダー (header.php):その2
- WordPressのTwenty Elevenテーマ解説:メインインデックスのテンプレート (index.php)
- WordPressでウィジェットを作るカスタマイズ
- WordPress 3のサイドバーにウィジェットを表示するカスタマイズ
- WordPressテーマ(WordPress 3.x対応)
- WordPress テーマ修正(レイアウトの不具合)


