WordPressのTwenty Elevenテーマ解説:ヘッダー (header.php):その3
WordPressの勉強も兼ねて、Twenty Elevenテーマの各テンプレートについて解説しています。確認バージョンは3.2.1です。
今回は「WordPressのTwenty Elevenテーマ解説:ヘッダー (header.php):その2」の続きです。
ヘッダー (header.php):その3
Twenty Elevenテーマの「ヘッダー (header.php)」は、スクリーンショットの赤枠で示す、WordPressのすべてのページのヘッダー部分(DOCTYPE~<div id="main">まで)に対応しています。

テンプレートのソースコードは次のとおりです。この回で説明するのは青色で示す部分です。
<?php
/**
 * The Header for our theme.
 *
 * Displays all of the <head> section and everything up till <div id="main">
 *
 * @package WordPress
 * @subpackage Twenty_Eleven
 * @since Twenty Eleven 1.0
 */
?><!DOCTYPE html>
<!--[if IE 6]>
<html id="ie6" <?php language_attributes(); ?>>
<![endif]-->
<!--[if IE 7]>
<html id="ie7" <?php language_attributes(); ?>>
<![endif]-->
<!--[if IE 8]>
<html id="ie8" <?php language_attributes(); ?>>
<![endif]-->
<!--[if !(IE 6) | !(IE 7) | !(IE 8)  ]><!-->
<html <?php language_attributes(); ?>>
<!--<![endif]-->
<head>
<meta charset="<?php bloginfo( 'charset' ); ?>" />
<meta name="viewport" content="width=device-width" />
<title><?php
    /*
     * Print the <title> tag based on what is being viewed.
     */
    global $page, $paged;

    wp_title( '|', true, 'right' );

    // Add the blog name.
    bloginfo( 'name' );

    // Add the blog description for the home/front page.
    $site_description = get_bloginfo( 'description', 'display' );
    if ( $site_description && ( is_home() || is_front_page() ) )
        echo " | $site_description";

    // Add a page number if necessary:
    if ( $paged >= 2 || $page >= 2 )
        echo ' | ' . sprintf( __( 'Page %s', 'twentyeleven' ), max( $paged, $page ) );

    ?></title>
<link rel="profile" href="http://gmpg.org/xfn/11" />
<link rel="stylesheet" type="text/css" media="all" href="<?php bloginfo( 'stylesheet_url' ); ?>" />
<link rel="pingback" href="<?php bloginfo( 'pingback_url' ); ?>" />
<!--[if lt IE 9]>
<script src="<?php echo get_template_directory_uri(); ?>/js/html5.js" type="text/javascript"></script>
<![endif]-->
<?php
    /* We add some JavaScript to pages with the comment form
     * to support sites with threaded comments (when in use).
     */
    if ( is_singular() && get_option( 'thread_comments' ) )
        wp_enqueue_script( 'comment-reply' );

    /* Always have wp_head() just before the closing </head>
     * tag of your theme, or you will break many plugins, which
     * generally use this hook to add elements to <head> such
     * as styles, scripts, and meta tags.
     */
    wp_head();
?>
</head>

<body <?php body_class(); ?>>
<div id="page" class="hfeed">
    <header id="branding" role="banner">
            <hgroup>
                <h1 id="site-title"><span><a href="<?php echo esc_url( home_url( '/' ) ); ?>" title="<?php echo esc_attr( get_bloginfo( 'name', 'display' ) ); ?>" rel="home"><?php bloginfo( 'name' ); ?></a></span></h1>
                <h2 id="site-description"><?php bloginfo( 'description' ); ?></h2>
            </hgroup>

            <?php
                // Check to see if the header image has been removed
                $header_image = get_header_image();
                if ( ! empty( $header_image ) ) :
            ?>
            <a href="<?php echo esc_url( home_url( '/' ) ); ?>">
                <?php
                    // The header image
                    // Check if this is a post or page, if it has a thumbnail, and if it's a big one
                    if ( is_singular() &&
                            has_post_thumbnail( $post->ID ) &&
                            ( /* $src, $width, $height */ $image = wp_get_attachment_image_src( get_post_thumbnail_id( $post->ID ), array( HEADER_IMAGE_WIDTH, HEADER_IMAGE_WIDTH ) ) ) &&
                            $image[1] >= HEADER_IMAGE_WIDTH ) :
                        // Houston, we have a new header image!
                        echo get_the_post_thumbnail( $post->ID, 'post-thumbnail' );
                    else : ?>
                    <img src="<?php header_image(); ?>" width="<?php echo HEADER_IMAGE_WIDTH; ?>" height="<?php echo HEADER_IMAGE_HEIGHT; ?>" alt="" />
                <?php endif; // end check for featured image or standard header ?>
            </a>
            <?php endif; // end check for removed header image ?>

            <?php
                // Has the text been hidden?
                if ( 'blank' == get_header_textcolor() ) :
            ?>
                <div class="only-search<?php if ( ! empty( $header_image ) ) : ?> with-image<?php endif; ?>">
                <?php get_search_form(); ?>
                </div>
            <?php
                else :
            ?>
                <?php get_search_form(); ?>
            <?php endif; ?>

            <nav id="access" role="navigation">
                <h3 class="assistive-text"><?php _e( 'Main menu', 'twentyeleven' ); ?></h3>
                <?php /*  Allow screen readers / text browsers to skip the navigation menu and get right to the good stuff. */ ?>
                <div class="skip-link"><a class="assistive-text" href="#content" title="<?php esc_attr_e( 'Skip to primary content', 'twentyeleven' ); ?>"><?php _e( 'Skip to primary content', 'twentyeleven' ); ?></a></div>
                <div class="skip-link"><a class="assistive-text" href="#secondary" title="<?php esc_attr_e( 'Skip to secondary content', 'twentyeleven' ); ?>"><?php _e( 'Skip to secondary content', 'twentyeleven' ); ?></a></div>
                <?php /* Our navigation menu.  If one isn't filled out, wp_nav_menu falls back to wp_page_menu. The menu assiged to the primary position is the one used. If none is assigned, the menu with the lowest ID is used. */ ?>
                <?php wp_nav_menu( array( 'theme_location' => 'primary' ) ); ?>
            </nav><!-- #access -->
    </header><!-- #branding -->

    <div id="main">
1.body要素のclass属性値の出力
body_class()でbody要素のclass属性を設定します。
<body <?php body_class(); ?>>メインページでは次のような出力になります。
<body class="home blog single-author two-column right-sidebar">記事ページでは次のような出力になります。
<body class="single single-post postid-6 single-format-gallery logged-in admin-bar single-author singular two-column right-sidebar">body_class()はwp-includes/post-template.phpに実装されています。
wp-includes/post-template.php
function body_class( $class = '' ) {
    // Separates classes with a single space, collates classes for body element
    echo 'class="' . join( ' ', get_body_class( $class ) ) . '"';
}
中で起動されているget_body_class()も同じファイルに実装されています(長いので掲載は割愛)。
2.ブログタイトルとキャッチフレーズの出力

次の部分でブログタイトルとキャッチフレーズを出力します。
            <hgroup>
                <h1 id="site-title"><span><a href="<?php echo esc_url( home_url( '/' ) ); ?>" title="<?php echo esc_attr( get_bloginfo( 'name', 'display' ) ); ?>" rel="home"><?php bloginfo( 'name' ); ?></a></span></h1>
                <h2 id="site-description"><?php bloginfo( 'description' ); ?></h2>
            </hgroup>
esc_url()でラップされているhome_url()は、wp-includes/link-template.phpに実装されています。
wp-includes/link-template.php
function home_url( $path = '', $scheme = null ) {
    return get_home_url(null, $path, $scheme);
}
中で起動されているget_home_url()も同じファイルに実装されていて、中ではget_option()またはget_blog_option()の値を利用しています。プロトコル(http/https)は、is_ssl()とis_admin()で決定しています。is_ssl()はセキュアなアクセスである場合に実行し、プロトコル(http/https)を振り分けます。
function get_home_url( $blog_id = null, $path = '', $scheme = null ) {
    $orig_scheme = $scheme;

    if ( !in_array( $scheme, array( 'http', 'https' ) ) )
        $scheme = is_ssl() && !is_admin() ? 'https' : 'http';

    if ( empty( $blog_id ) || !is_multisite() )
        $url = get_option( 'home' );
    else
        $url = get_blog_option( $blog_id, 'home' );

    if ( 'http' != $scheme )
        $url = str_replace( 'http://', "$scheme://", $url );

    if ( !empty( $path ) && is_string( $path ) && strpos( $path, '..' ) === false )
        $url .= '/' . ltrim( $path, '/' );

    return apply_filters( 'home_url', $url, $path, $orig_scheme, $blog_id );
}
esc_url()はURLに含まれる文字列をURIエンコードする役割があり、wp-includes/formatting.phpに実装されています。esc_attr()は属性値として設定する文字列をエスケープする役割があり、同じファイルに実装されています。
get_bloginfo( 'name', 'display' ) )でブログ名をa要素のtitle属性に設定します。 bloginfo( 'name' )はブログ名、bloginfo( 'description' )はキャッチフレーズを出力します。get_bloginfo()とbloginfo()は既出のため、解説は省略します。
3.ヘッダ画像の出力

以下の部分でヘッダ画像を出力します。記事ページではアイキャッチ画像を表示することもできます。アイキャッチ画像の詳細については別途エントリーしたいと思います。
            <?php
                // Check to see if the header image has been removed
                $header_image = get_header_image();
                if ( ! empty( $header_image ) ) :
            ?>
            <a href="<?php echo esc_url( home_url( '/' ) ); ?>">
                <?php
                    // The header image
                    // Check if this is a post or page, if it has a thumbnail, and if it's a big one
                    if ( is_singular() &&
                            has_post_thumbnail( $post->ID ) &&
                            ( /* $src, $width, $height */ $image = wp_get_attachment_image_src( get_post_thumbnail_id( $post->ID ), array( HEADER_IMAGE_WIDTH, HEADER_IMAGE_WIDTH ) ) ) &&
                            $image[1] >= HEADER_IMAGE_WIDTH ) :
                        // Houston, we have a new header image!
                        echo get_the_post_thumbnail( $post->ID, 'post-thumbnail' );
                    else : ?>
                    <img src="<?php header_image(); ?>" width="<?php echo HEADER_IMAGE_WIDTH; ?>" height="<?php echo HEADER_IMAGE_HEIGHT; ?>" alt="" />
                <?php endif; // end check for featured image or standard header ?>
            </a>
            <?php endif; // end check for removed header image ?>
get_header_image()は画像のURLを収集する役割があり、変数$header_imageに次のようなURLを設定します。
http://user-domain/wp/wp-content/themes/twentyeleven/images/headers/trolley.jpgget_header_image()はwp-includes/theme.phpに実装されています。
wp-includes/theme.php
function get_header_image() {
$default = defined( 'HEADER_IMAGE' ) ? HEADER_IMAGE : '';
$url = get_theme_mod( 'header_image', $default );
if ( 'remove-header' == $url )
return false;
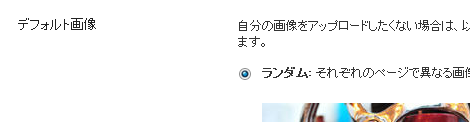
if ( is_random_header_image() )
$url = get_random_header_image();
if ( is_ssl() )
$url = str_replace( 'http://', 'https://', $url );
else
$url = str_replace( 'https://', 'http://', $url );
return esc_url_raw( $url );
}HEADER_IMAGEはテーマのfunctions.phpのtwentyeleven_setup()に定義されています(ただし値は空)。
function twentyeleven_setup() {
    //...
    define( 'HEADER_IMAGE', '' );
get_theme_mod()はテーマのオプションを取得する関数で、後述します。
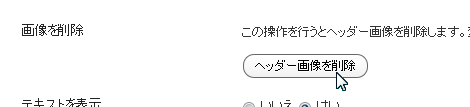
remove-headerの判定は、「外観」→「ヘッダー」で「ヘッダー画像を削除」をクリックした場合に実行されるものと思われます(間違っていたらすいません)。
is_random_header_image()は同じ管理画面で「ランダム」を選択している場合に実行される関数で、wp-includes/theme.phpに実装されています。
return時のesc_url_raw()は、esc_url()をラップした関数で、wp-includes/formatting.phpに実装されています。
function esc_url_raw( $url, $protocols = null ) {
    return esc_url( $url, $protocols, 'db' );
}
話を戻して、変数$header_imageに値が設定されていれば(=ヘッダ画像のURLがあれば)、home_url()とesc_url()を組み合わせて、ブログのメインページのリンクを出力します。
                if ( ! empty( $header_image ) ) :
            ?>
            <a href="<?php echo esc_url( home_url( '/' ) ); ?>">
                // ...
            </a>
            <?php endif; // end check for removed header image ?>
リンクのコンテンツの出力部分は以下です。
                <?php
                    // The header image
                    // Check if this is a post or page, if it has a thumbnail, and if it's a big one
                    if ( is_singular() &&
                            has_post_thumbnail( $post->ID ) &&
                            ( /* $src, $width, $height */ $image = wp_get_attachment_image_src( get_post_thumbnail_id( $post->ID ), array( HEADER_IMAGE_WIDTH, HEADER_IMAGE_WIDTH ) ) ) &&
                            $image[1] >= HEADER_IMAGE_WIDTH ) :
                        // Houston, we have a new header image!
                        echo get_the_post_thumbnail( $post->ID, 'post-thumbnail' );
                    else : ?>
                    <img src="<?php header_image(); ?>" width="<?php echo HEADER_IMAGE_WIDTH; ?>" height="<?php echo HEADER_IMAGE_HEIGHT; ?>" alt="" />
                <?php endif; // end check for featured image or standard header ?>
次の4つの条件を満たす場合、get_the_post_thumbnail()でアイキャッチ画像を出力します。
- 記事ページである(is_singular())
- 記事に画像が添付されている(post-thumbnail-template.php/has_post_thumbnail())
- 画像の情報(URL、高さ、幅)を取得できる
- 取得した画像の幅がHEADER_IMAGE_WIDTH(1000px)より大きい
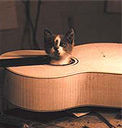
get_the_post_thumbnail( $post->ID, 'post-thumbnail' );アイキャッチ画像(=夕焼けの亜像)をヘッダに表示したところ

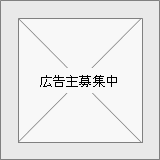
上記以外の場合は、Twenty Elevenテーマで用意されている画像を表示します。
<img src="<?php header_image(); ?>" width="<?php echo HEADER_IMAGE_WIDTH; ?>" height="<?php echo HEADER_IMAGE_HEIGHT; ?>" alt="" />header_image()はget_header_image()をechoする関数で、wp-includes/theme.phpに実装されています。
4.検索フォームの出力
次の部分で検索フォームを出力します。
<?php
// Has the text been hidden?
if ( 'blank' == get_header_textcolor() ) :
?>
<div class="only-search<?php if ( ! empty( $header_image ) ) : ?> with-image<?php endif; ?>">
<?php get_search_form(); ?>
</div>
<?php
else :
?>
<?php get_search_form(); ?>
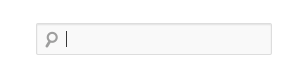
<?php endif; ?>デフォルトの状態ではページの右上に検索フォームを表示しますが、get_header_textcolor()の結果が「blank」であればdiv要素を挿入して、検索フォームをナビゲーションの右側に出力するようになっています。
デフォルト状態の検索フォーム

「blank」の場合の検索フォーム

get_header_textcolor()はHEADER_TEXTCOLORの値を出力する関数で、wp-includes/theme.phpに実装されています。
wp-includes/theme.php
function get_header_textcolor() {
    $default = defined('HEADER_TEXTCOLOR') ? HEADER_TEXTCOLOR : '';

    return get_theme_mod('header_textcolor', $default);
}
HEADER_TEXTCOLORは、テーマのfunctions.phpのtwentyeleven_setup()に定義されています。
function twentyeleven_setup() {
    //...
    define( 'HEADER_TEXTCOLOR', '000' );
twentyeleven_setup()は、functions.phpにある「after_setup_them」フックポイントで起動されます。
add_action( 'after_setup_theme', 'twentyeleven_setup' );get_theme_mod()は、現在のテーマについて第1パラメータで指定したキーの値(modification value)を取得する関数のようです。キーと値はテーマを切り替えたときにwp_optionsテーブルに保存されるようです。
function get_theme_mod( $name, $default = false ) {
    $mods = get_theme_mods();

    if ( isset( $mods[ $name ] ) )
        return apply_filters( "theme_mod_$name", $mods[ $name ] );

    return apply_filters( "theme_mod_$name", sprintf( $default, get_template_directory_uri(), get_stylesheet_directory_uri() ) );
}
get_theme_mods()も同じファイルに実装されています。
function get_theme_mods() {
    $theme_slug = get_option( 'stylesheet' );
    if ( false === ( $mods = get_option( "theme_mods_$theme_slug" ) ) ) {
        $theme_name = get_current_theme();
        $mods = get_option( "mods_$theme_name" ); // Deprecated location.
        if ( is_admin() && false !== $mods ) {
            update_option( "theme_mods_$theme_slug", $mods );
            delete_option( "mods_$theme_name" );
        }
    }
    return $mods;
}
get_theme_mods()は取得関数ですが、オプションの設定はadd_option()、更新はupdate_option()、またオプションの削除関数としてremove_theme_mods()があります。add_option()とupdate_option()はwp-includes/functions.phpに実装されています。
テーマの切り替えなどを行うと、これらの関数が実行されるようです。
5.ナビゲーションの出力

最後に、次の部分でナビゲーションを出力します。
            <nav id="access" role="navigation">
                <h3 class="assistive-text"><?php _e( 'Main menu', 'twentyeleven' ); ?></h3>
                <?php /*  Allow screen readers / text browsers to skip the navigation menu and get right to the good stuff. */ ?>
                <div class="skip-link"><a class="assistive-text" href="#content" title="<?php esc_attr_e( 'Skip to primary content', 'twentyeleven' ); ?>"><?php _e( 'Skip to primary content', 'twentyeleven' ); ?></a></div>
                <div class="skip-link"><a class="assistive-text" href="#secondary" title="<?php esc_attr_e( 'Skip to secondary content', 'twentyeleven' ); ?>"><?php _e( 'Skip to secondary content', 'twentyeleven' ); ?></a></div>
                <?php /* Our navigation menu.  If one isn't filled out, wp_nav_menu falls back to wp_page_menu. The menu assiged to the primary position is the one used. If none is assigned, the menu with the lowest ID is used. */ ?>
                <?php wp_nav_menu( array( 'theme_location' => 'primary' ) ); ?>
            </nav><!-- #access -->
以下は出力例です。
<nav id="access" role="navigation">
    <h3 class="assistive-text">メインメニュー</h3>
    <div class="skip-link"><a class="assistive-text" href="#content" title="メインコンテンツへ移動">メインコンテンツへ移動</a></div>
    <div class="skip-link"><a class="assistive-text" href="#secondary" title="サブコンテンツへ移動">サブコンテンツへ移動</a></div>
    <div class="menu"><ul><li class="current_page_item"><a href="http://localhost/wordpress321/" title="ホーム">ホーム</a></li><li class="page_item page-item-2"><a href="http://localhost/wordpress321/?page_id=2" title="サンプルページ">サンプルページ</a></li></ul></div>
</nav><!-- #access -->
wp_nav_menu()はナビゲーションメニューを出力するための関数で、wp-includes/nav-menu-template.phpに実装されています(掲載は割愛)。wp_nav_menu()には色々なオプションがありますが、詳細は別途エントリーしたいと思います。
Twenty Elevenテーマでは、テーマ内で使用する場所(ロケーション)を示す「theme_location」のみを設定しています。「theme_location」の値「primary」は、functions.phpにregister_nav_menu()で設定しています。
    // This theme uses wp_nav_menu() in one location.
    register_nav_menu( 'primary', __( 'Primary Menu', 'twentyeleven' ) );
functions.phpにregister_nav_menu()を追加していけば、ロケーションのバリエーションを増やすことができます。
register_nav_menu( 'secondary', 'フッターメニュー' );register_nav_menu()で複数のロケーションをまとめて設定することもできます。
register_nav_menus( array(
    'primary' => __( 'Primary Navigation', 'twentyten' ),
    'secondary' => 'フッターメニュー',
    'thirdly' => 'サイドメニュー',
) );
肝心のメニューの内容は、管理画面の「外観」→「メニュー」で設定します。

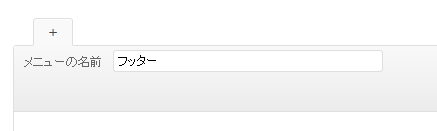
デフォルト状態では何も設定されていないので、先程の「フッターメニュー」用のメニュー内容を作りたい場合は、「メニューの名前」に「フッター」など任意の名称を入力して「メニューを作成」をクリック。
作成すると左側にメニュー項目として「カスタムリンク」「固定ページ」「カテゴリー」などがアクティブになり、同時に「register_nav_menus」に対応する「テーマの場所(ロケーション)」も表示されます。
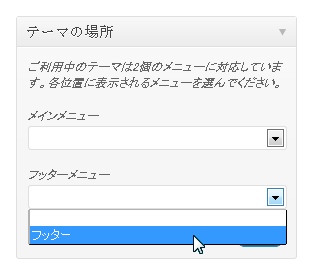
あとはそれぞれのロケーションに作成したメニューを作って「保存」をクリックします。フッターメニューは、テーマの「フッター」に次の記述すれば表示されます。
<?php wp_nav_menu( array( 'theme_location' => 'secondary' ) ); ?>- WordPressテーマ(レスポンシブWebデザイン対応)
- WordPressのTwenty Elevenテーマ解説:サイドバー (sidebar.php)
- WordPressのTwenty Elevenテーマ解説:固定ページテンプレート (page.php)
- WordPressテーマ(テンプレート)バージョンアップ
- WordPressのTwenty Elevenテーマ解説:content.php(その2)
- WordPressのTwenty Elevenテーマ解説:content.php(その1)
- WordPressのTwenty Elevenテーマ解説:単一記事の投稿 (single.php)
- WordPressのTwenty Elevenテーマ解説:フッター (footer.php)
- WordPressのTwenty Elevenテーマ解説:ヘッダー (header.php):その2
- WordPressのTwenty Elevenテーマ解説:ヘッダー (header.php):その1
- WordPressのTwenty Elevenテーマ解説:メインインデックスのテンプレート (index.php)
- WordPressでウィジェットを作るカスタマイズ
- WordPress 3のサイドバーにウィジェットを表示するカスタマイズ
- WordPressテーマ(WordPress 3.x対応)
- WordPress テーマ修正(レイアウトの不具合)